使用 Telegram Bot Platform - 建立一個聊天機器人
使用 Telegram Bot Platform 建立一個聊天機器人
自從 Line 2020/3/1 收費新制上路後,群發大戶們紛紛出走 此時 Telegram 突然就變的很紅,因此我們也來研究一下 Telegram 的 Bot platform 
有關 Telegram API 資訊可參考官方的說明: https://core.telegram.org/
Telegram API 類型
- Telegram APIs : 讓你可以建立自已的Telegram client
- Bot API : 可以使用Telegram的介面建立你的Bot
在此我們先以Bot API作為研究對象
建立BOT
首先我們必需先建立一個Bot帳號,而Telegram建立Bot帳號的方式很特別,透過與一個叫做BotFather的Bot建立! 以Telegram官方PC Portable版為例,使用搜尋功能找到BotFather
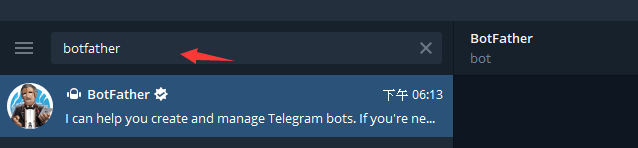
按下 start 後應該會看到如下圖的畫面
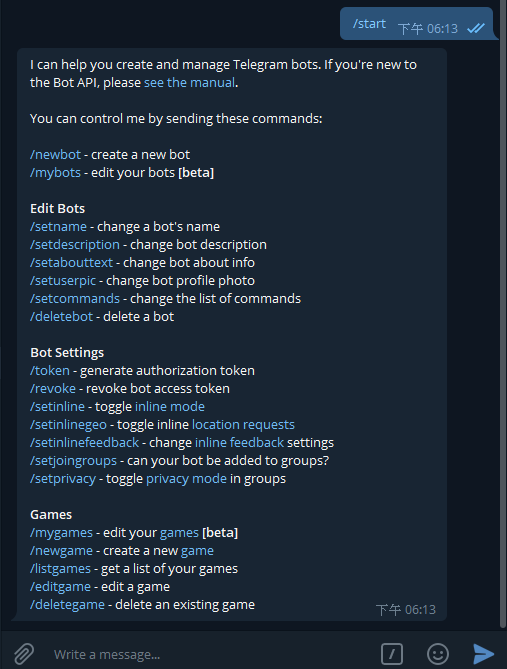
我們依照說明,在訊息欄輸入 /newbot 來建立一個bot 接下來BotFather 會請你輸入Bot name跟username,其中username必需以bot結尾,且不能與其它bot重覆,萬一重覆的話BotFather會請你重新輸入 完成後會得到一個token如下圖:
接下來就可使用username或是 在瀏覽器輸入 https://t.me/{你的username} 找到你的Telegram Bot了!
設定Webhook接收訊息
首先, 我們與 Telegram Bot API 的溝通方式為送出 Http Request 到以下位置 https://api.telegram.org/bot{token}/METHOD_NAME {token} 是上一步取到的值, METHOD_NAME 則看使用的方法來調整 參考官方文件: https://core.telegram.org/bots/api
獲取訊息的方法有2種:
getUpdates 好處是使用方便,不需要建立web api的服務,壞處是需要定期不斷的發出Request去詢問Telegram以取得新訊息
setWebhook 與 getUpdates 相反,需另外建立webapi較為麻煩,但可以獲得立即的訊息通知,不需要一直發Request去詢問, 另外根據官方的說明需要注意的是setWebhook後,將無法再使用getUpdates取得訊息!
我們以 setWebhook 的方式實作,因此我們發一個 Request 到以下位置 ( 注意 Method_Name 改為 setWebhook,{token} 則使用步驟一取到的 token 取代 https://api.telegram.org/bot{token}/setWebhook?url=<你的webapi url="">
至於你的web api要怎麼確定request來自Telegram呢?? Telegram官方是建議路徑內包含token,例如: https://www.example.com/{token} 由於沒人其它人你bot的token所以可以借此確定request是來自於Telegram… 這樣的驗證方式是還滿特別的啦…..
我們以curl丟出setWebhook的Request範例如下:
1
    curl - location - request POST 'https://api.telegram.org/bot{token}/setWebhook?url=https://jbot.joybomb.com.tw/Telegram/<你的webapi url>'
成功的話,我們會收到這樣的Response,代表已經成功設定webhook了
1
2
3
4
5
    {
    "ok": true,
    "result": true,
    "description": "Webhook was set"
    }
同時,我們也馬上收到來自Telegram的webhook,格式如下:
1
2
3
4
5
6
7
8
9
10
11
12
13
14
15
16
17
18
19
20
21
{
    "update_id": 123456789,
    "message": {
        "message_id": 3,
        "from": {
            "id": 987654321,
            "is_bot": false,
            "first_name": "Benson",
            "username": "Benson",
            "language_code": "zh-hans"
        },
    "chat": {
        "id": 987654321,
        "first_name": "Benson",
        "username": "Benson",
        "type": "private"
    },
    "date": 1583293134,
    "text": "hello world"
    }
}
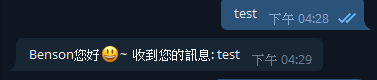
回覆訊息
與上一步驟差不多,這次我們使用的是sendMessage方法 參數: chat_id : target chat id ( 從webhook中取得 ) text: 要發送的訊息 ( 1–4096字元 )
使用curl範例如下:
1
2
curl --location --request POST 'https://api.telegram.org/bot{token}/sendMessage?chat_id={要發送的chat_id}&text={訊息} \
--header 'Content-Type: application/x-www-form-urlencoded'
成功發送的話應該會收到以下的Response:
1
2
3
4
5
6
7
8
9
10
11
12
13
14
15
16
17
18
19
20
{
 "ok": true,
 "result": {
    "message_id": 24,
    "from": {
    "id": 1078990875,
    "is_bot": true,
    "first_name": "Bot_First_Name",
    "username": "Bot_User_Name"
 },
 "chat": {
    "id": 978590581,
    "first_name": "Benson",
    "username": "Benson",
    "type": "private"
 },
 "date": 1583311622,
 "text": "訊息"
 }
}
以上 這樣就可以完成一個簡單的Echo Bot ~ 打完收工 XDD
其它說明:
訊息發送的限制 每秒不得超過30次、同群組每分鐘不能超過20次 ,否則會被擋掉!
資源
Telegram API : https://core.telegram.org/
Telegram Bot Platform : https://telegram.org/blog/bot-revolution
Bots : An introduction for developers : https://core.telegram.org/bots
FAQ : https://core.telegram.org/bots/faq